Wednesday, December 19, 2007

Pan Grilled Dory Fillet with Baby Asparagus finished in Broccoli honey sauce


I love fish or any type of fish for that matter. They are easy to cook and have their own distinct flavors too ! All you need is to cook it with a sauce and that's it ! I choose Dory as its usually skinned and debone. It has a nice creamy silky texture and its taste great !


200g Dory Fillet ( please try not to get those that were chilled to a rock )

40g of Broccoli cleaned and blended fine in a food processor ( leave out most of the stem )

150g of Baby Asparagus ( chopped )

1 table spoon of Honey

1 cup of heavy cream

1/2 cup of white wine or apple cider

1 teaspoon of freshly chopped Rose Mary herb or the ones from a herbs bottle.

1 teaspoon of onion salt

4 table spoon of salted butter

1/2 teaspoon of black pepper


Heat up a large grilling pan, add in 1 table spoon of butter and start cooking the baby asparagus in it. Season to taste with the onion salt, black pepper and rose Mary herbs. Just lightly cook it for about 1 minute or so and then set them aside.


Now add in all the butter , add in the pepper , onion salt and the rest of the rose Mary herb over the melted butter. Just sprinkle them over the area on the pan which you will be placing the Dory fillet. Grill the Dory over medium high heat for about 3 minutes on 1 side. Once the first side is ready just season the top side with Onion salt and black pepper before you flip it over and grill for another 3 minutes.


Remove the Dory from the grilling pan and sent it on a large flat serving plate. Arrange the cooked baby asparagus on top of the Dory fillet. Now we move on to the sauce. Using back all the sauce that was left behind on the grilling pan, add in the white wine or apple cider, take a wooden spoon and start gently scrubbing off the sticky chunks of dory fillets that was left on the pan. After that add in the heavy cream and 1/2 table spoon of the blended broccoli. Add onion salt and honey to taste. Once the sauce mixture is reduced and thicken for about 3 to 4 minutes , carefully spoon the sauce around the Dory Fillet and serve immediately. Enjoy !!

Pasta with Broccoli Ham Chips and Gorgonzola


I always love the strong tangy flavour of Gorgonzola cheese, though a little on the pricey side. Still have you ever wonder how wonderful it would taste when its put into your mouth? It more then worth its weight in gold. Hey think of it this way, cant argue with hundreds of years of approvals and market demand since the day it was discovered hehehehe.


200g of Pasta cooked till Al Den ta ( drained )
100g of Gorgonzola Cheese with rims removed
150g Fresh Broccoli cut into bite size
150g of Ham Chips of any type of meat
1 cup of heavy cream
1/2 cup of whitewine or apple cider
3 tablespoon of salted butter
1 teaspoon of onion salt
1 teaspoon of black pepper
2 cloves of fresh garlic diced


First add the butter into a pre heated deep pan, add in the ham chips and garlic. Stir fry the mixture for about 3 minutes or so. Add the onion salt and pepper to taste. Once the ham chips and the garlic starts to brown a little on the edges, add in the wine or apple cider together with the heavy cream. Boil the whole mixture for about 5 minutes or until its reduced and thicken. While you were cooking the mixture you have to prepare boiling water and bath the broccoli in it for 20 secs, drained and set aside.

Lower the heat of the deep pan, toss in the broccoli which you had prepared earlier. Make sure the broccoli is all well coated with the mixture. Now add in the Pasta and the diced Gorgonzola Cheese and toss until you can see the cheese had started to melt and gives off the heavenly smell. Serve immediately with garnish of Italy Chives and Parmesan cheese. Enjoy !

Sunday, November 25, 2007

Chicken Steak in Whitewine Cream Sauce Macaroni & Broccoli


Today I had a special guests dropping by my kitchen, she doesn't really enjoy western cooking but I promised that she would at least be able to swallow my cooking hahahaha... when I asked what she like to try and she of cause replied conservatively..." Chicken would be nice :) " and that's why I decided to prepare this no nonsense dish which is easy to cook and not too heavy on the taste buds to whom already had way too much MSG and Chinese Yan Chow Fried Rice !

200g Single boneless skinless chicken breast meat
100g of fresh Broccoli
150g of Cooked Macaroni drained
100g of Frankfurt's sausages diced in small cubes
1/2 of large onion finely diced
1/2 cup of heavy cream
1 cup of White Wine
2 table spoon of Parmesan Cheese
1 table spoon of salted Butter
1 teaspoon of salt
1 teaspoon of dried mixed herbs
1 teaspoon of white pepper powder
1 teaspoon of black pepper powder
1/2 teaspoon of red chili powder flakes

Boil up a pot of water with a little pinch of salt. Once the water is bubbling, turn off the heat and quickly bath the cloves of broccoli into the hot water, rinse and drained after a few secs. Set it aside.
Heat up a frying pan with no oil at all. Once there is smoke coming off the hot surface put in the butter and immediately place the chicken meat over it. Now take a pinch of salt, white pepper and herbs with your fingers, sprinkle over the chicken meat on the top. Let the chicken cook for about 2 mins and flip it over. Repeat the seasoning on the this side of the chicken too. Don't use too much salt. Just a little pinch will do. Now use a wooden ladle and press down on the meat to help it cook better. After 2 mins flip it over again and repeat the last step. Cook and press for another 2 mins or so then lift the chicken breast out of the hot pan and set it aside on a large serving plate. Place the cooked broccoli on the plate too.
Now with all the juices still in the pan add in the white wine and onions. Cook for about 5 mins and then add in the cream and cook for another 5 mins. Once it ready season with salt and black pepper to taste. Add in the diced sausages and 1 teaspoon of Parmesan cheese. Cook for another 5 mins and turn off the heat.
Before you add in the Macaroni please fill up a small bowl of the sauce and set it aside. Now add in the Macaroni and stir it all nicely till everything is coated well in the sauce. Now serve the Macaroni onto the side of the Chicken Breast and the broccoli. Serve immediately with a little bit of the sauce you set aside earlier in that small bowl over the chicken breast and the broccoli. sprinkle a little bit of the Parmesan cheese over the Macaroni too. Enjoy !!

Monday, November 12, 2007

Steak with Pink Potatos & Broccoli


Today I felt really hurry for some reason haha... maybe due to skipping lunch I guess.. anywayz was at happy hours with my friends at Bangsar, on my way out I just decided to have steak at home tonight :)


250g Tenderloin Steak ( not chilled or frosted )
150g of Pink Potatos
150g of Broccoli ( anyways you can use other vegetables too )
2 tablespoon of salted butter
1 teaspoon of salt
1 teaspoon of black pepper
1/2 cup of heavy cream
100g of large onions finely chopped
1/2 cup of White Wine
1 tablespoon of Parmesan Cheese


First boil the Potatos in a pot for 15mins , remove and set aside.

While the water is till boiling, just rinse the vegetables for about 15 secs or so.

Drain the vegetables and set aside. Now heat up the pan till its smoking hot. Next set the heat back to medium from high before, immediately season the steak on both sides with little salt and black pepper followed by adding the butter into the heated pan. Next follow by placing the whole steak on top of the butter. Cook the steak on each side for no more then 2 minutes, take the steak out and set it on the large serving plate with the vegetables and potatos.


Next, use back the same pan with the left over butter and steak juices from before, add in the white wine and onions, cook for 4 mins or so till the onions are nice and transparent. Next add in the cream and cheese. Cook for about 4 mins , add in black pepper and Parmesan cheese. Carefully spoon the sauce over the beef steak and serve immediately !!

Enjoy it ! I sure did hehe..:)

Saturday, November 10, 2007

Spaghetti in RedWine sauce


This is one of my favourite type of Pasta, its not too dry and not too wet. It absolutely easy to cook, just takes you 25 mins from start to end. Its what I usually cook when I am just lazy :P, dont be fooled by its simple ingredients cause it packs a flavourful punch like Mike Tyson.


200g of Spaghetti ( boiled for 15mins and drained dry )
1 cup of Red Wine
1 cup of Heavy Cream
2 tablespoon of grated Parmesan Cheese
2 tablespoon of salted butter
100g of any meat slices ( beef steak, lamb steak, take care its not frosted or wet with thawing )
1 tablespoon of black pepper
1 teaspoon of salt
1 large onion finely diced


Heat up a frying pan. Turn the heat up to max and wait several minutes until you see theres vapour coming from it. Sprinkle the pepper and salt on the meat and then add in the butter into the smoking pan immediately followed by the meat steaks on top. Turn the heat down to low and shear the meat for 2 mins. Then flip the meat and shear for another 2 mins. Remove the meat from the pan but leave all the oil and juices in the pan.


Now be very careful while your adding the red wine, sometimes it catches fire but dont panic just let the alcohol burn out in a couple of minutes. Next add in the onions and stir the sauce for about 1 min and a half, next add in the cream slowly to see how much sauce you want. Finally add in the cheese to taste.


Now place the spaghetti and meat on a large flat serving plate. Next spoon the boiling sauce slowly on to the spaghetti and a little on the meat. Yes you can bath the meat in the sauce if you like ~ ~! hehehe serve immediately with a dash of Parmesan cheese for taste :D


Pasta Spicy Soup

It was a cold morning.. after going out most of the night and morning, it started to rain hehe... so I thought to myself " nothing could be better but a nice hot bowl of spicy soup to get the blood moving hehehehe"


300g of corn bits
2 large egg
300g of pasta
300g of minced meat
1 tablespoon of spicy red chili flakes
1 tablespoon of honey
1 table spoon of extra virgin olive oil
1 teaspoon of salt
1 teaspoon of black pepper
1 large finely diced onions
4 cups of chicken or beef stock ( you can use stock cubes if you want )
1/2 cup of red wine
First heat up a nice deep soup pan with the olive oil, after 1 min add in the onions and stir fry em for 4 to 5 mins till they are transparent. Now add in like 500 ml of boiling water and then the pasta. Cook the pasta in the soup for about 15 mins then add in the beef stock or chicken cubes. Boil for another 5 mins and add in the meats, any herbs, chili flakes to taste, salt to taste, all the honey and corn in. Finally, beat the eggs in a bowl and then slowly add the eggs in while constantly stiring the pot. Boil for another 10mins and serve piping hot with a dash of black pepper !

Sunday, November 4, 2007

Macaroni & Cheese


This is a traditional American favourite :D its easy and fast to make from start till end in less then 15 mins. Truly the winner of TV Dinner awards. Its what they call in the US , the maggie mee of US of A hehehehe.

300g of Macaroni
150g of Salted Butter
100g of Cream Cheese
1/4 cup of Table White Wine
1 teaspoon of Mixed Herbs
150g of Chicken Sausages Frankfurt's diced

Heat up a deep pan and water, boil the Macaroni for about 15mins , drain and set aside
Next heat up the pan and add the butter, slowly melt it in and take care not the bring the melted butter to boil. Next add in the cream cheese and slowly stir in for about 5 mins or so.
The thing is, keep in mind the longer and hotter you cook cream cheese, they eventually become butter :P so always remember to maintain a low heat flame and cook it long enough for the cheese to be soft and sticky.

Now add in the herbs and Sausages and stir fry for 3 mins or so and add in the white wine.
After that add in the macaroni and tossed them well. Serve immediately :D !

Spaghetti in Green Peas & Sausages


This has to be the craziest creation yet, the ingredients are so easy to find the a guinea pig can cook hahaha, anywayz it was what I could find around the kitchen at that time really, some left over spaghetti , a can of green peas and some sausages. Easy and great tasting :)
300g of cooked Green Peas
300g of Spaghetti
300g of Sausages Frankfurt's
1/2 cup of water
1 teaspoon of chicken stock powder
1 large Onion finely diced
2 tablespoon of honey
150g of Salted Butter
1/4 cup of Table White Wine
300g of grated Parmesan Cheese
Heat up a deep pan of water and cooked the spaghetti for about 15mins, drain and set aside.
Next heat up the deep pan and melt all the butter slowly, add in the diced onions in and cooked over a slow medium heat for about 10 mins or till the onions turns transparent.
Now add in some water and add in the chicken stock powder. Next after about 2 mins add in the white wine and stir sizzle over low medium heat for another 5 mins or so.
Now add in the sausages and half of the Parmesan Cheese. After about 4 mins, turn off the heat and immediately add the spaghetti in and start tossing till well coated. Serve immediately on warm plates with a dash of some of the grated Parmesan Cheese on top.
Enjoy !!

Thursday, September 27, 2007

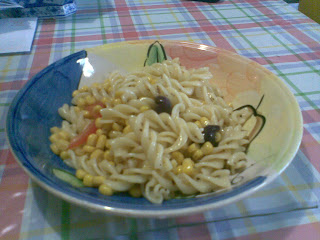
Pasta Salad, black olives, corn & fresh tomato slices


Today I going to prepare a nice juicy salad thats fresh in taste but full of flavor. I came upon the original recipe from the book " Pasta Bible ". Its my favorite read now :D , I selected this to modify as its very easy to prepare and fun to eat , great for snacking too !
1 whole lemon juiced
400g of Pasta cooked till al Denta ( 20mins in boiling water )
1 whole tomato
1 Can of Corn in salt solution ( no cream or sugar added )
10 to 15 pit Black Olives
2 table spoon of honey or maple syrup
1/2 teaspoon of table salt
1 table spoon of black pepper
1 teaspoon of finely chopped garlic
1 tablespoon of finely chopped shallots or onions
4 table spoon of Extra Virgin Olive Oil
1/2 table spoon of Mixed Spices ( theres dried dill , rosemary , thymes , basil , etc.)
Start by heating up the deep sauce pan with the oil . After 5 mins switch to medium low heat and add in the garlic and onions. Cook for about 5 mins and then add in the Pasta. At the same time switch to low heat. Add in the Spices and continue to stir the pasta. Add in the juices of the Lemon slowly to taste. Some like it more zangy then others. lastly add in the salt and pepper to taste.
Before Serving turn off the heat and add in the Honey or Maple syrup slowly to taste also. Serves up !

Stir the pasta in the hot oil mixture till its all well coated.

Saturday, September 15, 2007

Gnocchi in Garlic Butter sauce


Last time we had Gnocchi in tomato sauce, this time we will try it in our all time favorite sinful garlic butter sauce. For those of you who haven't read my early post on Gnocchi making just refer to this link :)

http://www.nimamok.com/2007/08/gnocchi.html

Here are the ingredients for my garlic butter sauce.

1 tea spoon of finely minced garlic ( use a food processor :P )
1/2 a stick of butter
2 or 3 cups of full cream milk ( if you like a heavy sauce you can use cooking creams )
some salt
some black pepper
1 table spoon of mixed herbs ( as before you can get them from Cold Storage )
1 teaspoon of powder form Parmesan cheese

Now using low medium heat, start by melting all the butter in a large sauce pan slowly. Just before the butter completely melts and right before simmering, add in the milk or cream which had been microwaved for at least 4 mins. The reason is you don't want the butter to be cooled by the cold milk or cream. Now continuously stir gently while the butter and the milk or cream is brought to a slow light boil, make sure you maintain as light a heat level just enough to bring the solution to a light simmer.

Now add in the garlic in small portions to taste. The reason is its very selective how others like their "Garlicness" in their garlic butter sauce, some like it nice and strong while some like it mild and sweet. Well now was you gotten the level of garlic taste in the solution, add salt and pepper to taste. Finally add in all the mixed herbs to the sauce with the heat turned off and stir for about a min.

Now put your boiled and drained Gnocchi in a low serving plate. If you can I prefer to microwave the plate for about 1 min to warm it up before putting the Gnocchi on it. Then spoon as much of the garlic butter sauce as you like onto the Gnocchi, bathing it in the rich tasty sauce.
Sprinkle some freshly chopped Parsley on top and some grated cheese and serve !

Buon Appetito !

Wednesday, September 12, 2007

Pasta Stir fried in minced chicken, herbs & onions.

This recipe is all my own, no research no reference just take what ever thats available in the fridge and whip this up..and the result is my first real fushion cooking ....

300g of pasta
200g of minced chicken
100g of diced large onion
20g of mixed herbs
1 cube of chicken stock
1/4 cup of Olive oil extra virgin
10g of table salt
1 clove of diced garlic
1 table spoon of black pepper

Heat up the oil in a deep saucepan, add in the garlic and onion, stir fry for 4 mins in low medium heat till the onions starts to become transparent, add in the chicken stock cube and minced chicken, stir fry till the cube is completely dissolved.

Add salt and pepper to taste and also the spices and herbs. Add in the pasta that had been boiled for 15mins before of cause. Continue to stir fry to coat all the pasta in the friend

Next add salt to taste and the black pepper finally and stir fry a little more then 1 min and serve up while its piping hot !

Monday, September 10, 2007

Lemon Cheese Cake


This was the cake I made for my birthday party at home :) I choose this flavour as the citrus flavor helps the food along once my guests had finished off the heavy stuff hahaha... and washing it all down with a nice glass of table white wine :D To all my friends I love you guys sooo much !!

250g Ricotta Cheese
400g Cream Cheese
1/2 cup of butter
3 table spoon of Lemon Zest
1 teaspoon of Pure Vanilla extract
3 cups of sugar
2 cups of Sour Cream
5 egg whites
1 whole egg
enough digestive biscuit for the bottom layer of the cheese cake

First take those digestive biscuits and put a hand full of them into a ziplock bag, make sure there's not too much air trapped inside when you zip it up and crush the biscuits inside real good. The reason I choose to use a large ziplock bag cause not only they are tough, but also allows you to see where are the larger chunks within and pinpoint crush them up :)

Now use some butter and grease a 9" spring form pan and start filling the crushed biscuits in to form a roughly 3 mm thick layer of biscuits. Use any flat flexible plastic lid like those that comes with plastic lunch boxes, to press and pack in the biscuits at the bottom of the pan.

Now mix the 2 types of cheese in a large mixing bowl. Make sure they are room temperature so its easier to hand whipped. Yes ! you heard right .... using a hand whip is the best as you can control the size of the rotation and the single direction you start and end with. That means if you started with a clock wise direction please try to maintain that direction all the way till the end.
Reason is something to do with aligning the food fibres within the mixture to 1 single direction :P

Now add in 1 whole egg and whip. Next make sure the mixture is blend well and start adding in 1 egg white at a time, continue whipping until each egg white added is completely blend in before the next egg white is added in. After the 5th egg white has been blended in then add in the vanilla extract, half the lemon zest ( grated skin of a nice fat lemon ), 1/2 cup of Sour Cream and enough sugar to taste. Now pour the whole mixture into the spring form pan on top of the pressed biscuit layer slowly. Level the top out evenly and back for 45 mins at 175 degrees C. After that lower the temperature to 150 degrees C for another 10 mins or so or until the center of the cheese cake is set. Now take it out and leave it out in the table to cool for 10 mins.

Now take the 1 and 1/2 cups of sour cream into a mixing bowl, add in the rest of the lemon zest and sugar to taste. Once you have whipped all of that to a nice clean mixture just slowly pour it over the baked cheesecake which is still in the spring form pan. Now lower the temperature of the oven to 125 degrees C and bake for another 15 mins.

Take the cake out of the oven and let it cool for about 1 hour to 2 hour till its at room temperature before you cover the top with some light flat material like cupboard or a flat dish and set it inside the fridge for at least 8 hours but 12 hours is best ! When read serve with a nice glass of white wine :) bon apatite :D

Monday, September 3, 2007

Daube of Mutton


The thing about the taste of mutton, it can be very tricky to get the right blend of seasoning to bring out its most attractive flavors and decrease the undesirable ones. Although many cultures has found their own unqiue ways to do that, I would like to share just one of the many delightful ways to prepare mutton and enjoy its wonder aroma and taste :D

500g of cubed lean mutton
60g of cornstarch
60ml of Extra Virgin Olive Oil
1 or 2 Large Onion chopped
1 or 2 cloves of fresh garlic chopped
500ml of broth ( I used Brovil instant broth )
200ml of Red Wine
5g of Dried Mixed Spices ( you can get a bottle of these from ColdStorage Supermarket)
Adequate black pepper
Some rings of orange skin ( optional )
2 whole zucchini either chopped large chunks or you can slice it thin
300g of Sweet Potato ( I used the yellow kind )

First trim off any visible fat you find on the mutton, as to prevent when you bake it the fat would melt and increase a layer of unsightly oil over it. Next use a large frying pan with enough Olive oil and fry the mutton cubes until brown or for no more then 4 minutes per batch. Remove the mutton from the pan but keep the oil.

Next add the remaining oil in and heat it up. Now throw in the garlic and onions and stir fry it till nice light golden brown. Now add in all the vegetables to stir fry for about a minute or 2. Now add in the wine , broth, herbs and black pepper to taste to the mixture and keep stirring till it starts to boil again. Now add the mixture together with the Mutton into a large 3 inch deep baking pan or large cassrole bowl. Now Preheat the oven first to 410 F or 210 C degrees and place the whole thing in to be baked for 1hour to 2 hours max. This is also be shortened if the mutton is tender and ready.

Finally add in the sweet potatos and the Zucchinis and bake no more then another 30 mins.

Serve this great dish with either bread or white rice cooked in a little bit of white vinegar and dill spices.

Enjoy !!!

Friday, August 31, 2007

Tiramisu - traditional


I always love the smooth almost ice cream texture and taste of a Tiramisu cake, today I decided to whip one just to satisfy that craving of mine. There are alot of great Tiramisu recipes around but sometimes you just wanna take control of the flavor and just have to tweak the taste to your liking :D

1000g of Mascarpone Cheese ( available in ColdStorage IKANO )
170g of Custard Sugar
25g of water
200g of egg yolks
150g of egg whites
1 whole lemon zest
1 standard little bottle of Coffee Kahlua ( can be bought at any confectionery stores )
1 standard little bottle of RUM ( can be bought at any confectionery stores )
60g of Gelatin Powder ( can be bought at any confectionery stores )
12 to 20 sticks of bakery ladyfingers breadbiscuts ( can be bought at any confectionery stores )
3 table spoon of Instant Coffee ( no sugar no cream )
5 table spoon of unsweetened cocoa powder


First you need to dissolve about 20g to 25g of water with about 150g of sugar on a saucepan with low heat. Bring the solution to a slight boil and pay attention not to let the sugar solution brown and become too burnt or else it might just crystallize on you :P
Now while its steadily been brought to a slight boil in low heat , you pour the egg whites into a bowl and add the rest of the sugar into it and gently whisk it to dissolve the sugar completely.
Now once both the water sugar and egg whites sugar solutions are ready, just pour the egg whites solution into the water sugar solution and continue boiling it with a low heat. Always remember to keep stirring the combined solution continuously to prevent the egg whites from cooking and the solution burning at the bottom of the pan. Switch off the heat once boil further 6 mins or so.

Now empty the Mascarpone Cheese straight from the fridge into the large mixing bowl. Take special note that the cheese need not or recommended not to be at room temperature as these cheese are so light they start to turn into milk when left outside the fridge :P Add in the egg yolks and ONLY use a hand whisk to slowly and gently whip the cheese and the egg yolks together to get a off light yellowish cheese. Take special care Tiramisu is a about patients and tender loving care. The gentle slow whipping of will produce very nice thick creamy cheese mixture that will be easy to spread later into the 9 inch Spring pan. Once the creamy cheese mixture is achieved, add in the Coffee Kahlua and RUM to taste with the Gelatin Powder. Continue to slowly slowly whip the creamy cheese mixture now until all the Coffee Kahlua and RUM is well mixed.

Finally combine the previously prepared Egg whites , sugar and water solution slowly into the creamy cheese mixture little bit by bit and until to taste. Some people like it just light on taste while others want it brute flavored as while so its up to you. Just remember to slow blend by hand only ( no machine please ! or the cheese will melt and the egg yolks and egg whites will bloat ) until all mixed up and tasting great !

Now prepare a strong coffee mixture with warm water. Next prepare the spring pan and place the Breadbiscuts in it so that the whole bottom is lined. After that take a tablespoon and slowly scoop the strong coffee mixture over every piece of the breadbiscuts to have it all soaked in the coffee. Next scoop enough of the Tiramisu creamy cheese mixture to cover the coffee soaked breadbiscuts.

Now on top of that first layer of Tiramisu, you will repeat the same coffee soaking breadbiscuts technique again. Once done just scoop the rest of the thick creamy cheese into the spring pan.

Now place the whole Tiramisu into the fridge and chill overnight or 8 hours or so. Check if the Tiramisu is nice and set before opening the spring pan. Sprinkle the Cocoa powder over the cake which ever way you like it and serve immediately ! Have Fun !!

Wednesday, August 29, 2007

Steamed Sliver Cod in Teow Chew Bean Paste


This is the 2nd chinese dish I prepared :D.
Those of you who love fish like me would really love this timeless favorite :P
Its really really easy and all it takes from start till end is just 30mins !!! heres now you make a bad ass steam fish :P

300g - 500g Silver Cord or any fish you like :D
50g chopped old ginger
30g chopped shallots or small onions
10g Chopped Chilly padi ( yeah baby ! we talking spicy ! )
10g Garlic cloves chopped
50ml of Extra Virgin Olive Oil

Seasoning
1 table spoon or 2 table spoon of Teow Chew Bean Paste
1 table spoon of Light Soya Sauce
1 table spoon of oyster sauce
1/2 teaspoon of salt or to taste
1 table spoon of White wine
Sugar to taste
1 table spoon of cornstarch or tapioca flour

250ml of water

Heat up the water in a steamer pot or just a deep sauce pan with the stainless steel support grills in the middle. Once the steam starts to build up, place the fish on top of a bed of chop sticks suspended over a shallow plate. The reason is that I dont want the smelly juices that steam out of the fish to be bathing the steamed fish with it the whole time.

Now cover the whole thing up to steam for no more then 7mins tops. Now after that drain off the smelly juices collected under the suspended fish on the the chopsticks and set the fish aside on the serving plate.

Start by heating up a deep sauce pan with a little bit of olive oil, once its heated up drop in the garlic and the ginger and let it simmer up in medium low heat settings. Once the aroma is coming off add in all the other spices and the chillies. Now when it gives of the spicy aroma which could be just 20 secs of cooking add in the white wine and all the seasoning. Also at in like 1/2 cup of water or 200ml to 250ml. Now add more salt or sugar for taste.

Pour the whole paste thats piping hot over directly into the steamed fish and serve immediately :D Happy cooking and eating !!!

Monday, August 27, 2007

Herbal Soup with Vegetarian Mutton

This is something that is easy to cook and very nice to have.. its a kind of herbal tea soup.
Usually they cook it with real spare ribs or chicken. I decided to use vegetarian glutton for my cooking. I prefer to use the vegetarian mutton, as its made of primarily Chinese mushroom fibres so it would not just disintegrate after a couple of hours of boiling...... the thing about Chinese herbal soup... you boil for up to 8 hours :P

5 large bowls of water
1 pack of Chinese chicken herbal soup herbs ( you can get them at local shopping malls )
1 pack of 350g of vegetarian mutton glutton.
some salt


Boil the water for about 20 mins. Add in the herbal mixture into the water. Boil the water for 30 mins with the herbal. Now if you are using real meat, please make sure there is bones with it but you can get rid of the skin. And you need to rinse through the real meat with boiling hot water before adding into the boiling herbs.

But since i am using vegetarian mutton, I just have to dump them in. By now the liquid with the herbs would be boiling for 30mins or more, turn down the heat to the lowest setting and let it slow boil for up to eight hours. If you had about 1 litre of water to start with in a large bowl it should be enough.

Now its 8 hours already and you just have to add salt to taste and serve it up ! Happy drinking ;D

Monday, August 20, 2007

Seafood Pasta in heavy cream sauce & Japanese Wild Mushrooms


This has got to be the most commonly loved Pasta selection around KL I think :) Now to share with you a secret .... its also to easiest to cook yourself ! The best thing is you can put as much seafood as you like !


400g of any Pasta ( cooked for 15mins in Salted boiling water )
200g of fresh Salmon with no skin
200g of shrimp with no skin
200g of mussel with no shell
200g of sliced Japanese Wild Mushrooms
1 table spoon of dill
1 table spoon of basil
1 table spoon of fresh mashed thymes
1 table spoon of freash mashed parsley
1 table spoon of salt
1/2 cup of white wine
1 table spoon of black pepper
1/2 cup of powder Parmesans cheese
4 cups of heavy cream
1 1/2 table spoons of chopped garlic
1/2 cup of Extra Virgin Olive Oil

First you need to heat up the oil in the deep sauce pan, next add in the garlic and let it sizzle for 1 min or 2 mins in medium low heat. After the garlic has turn brown with a nice aroma coming from the oil add in the Mushrooms and stir fry them till some juices comes out. Thats usually takes about 4 mins or so. Now Chopped up the salmon into little cubes and add them to the pan , together with the shrimps and mussels.

After about 1 min, add in the dill , pepper , thymes , basils , parsley and half of the salt.
Now after another 1 min of tossing ans stir frying the contents add in all the white wine and let it simmer for about 2 mins. Now add in the heavy cream and bring everything to a slow boil.

Once the sauce is nice and hot add salt to taste, and then the cheese to taste too. You can increase the taste as much as you like with the salt and cheese.

Now put in the boiled Pasta and make sure you stir and coat the pasta in the rich sauce !
Serve the Pasta with sprinkles of cheese to the ones you love ! enjoy !

Sunday, August 19, 2007

Light Yogurt Cheese Cake


The other day one of my cheese loving friend made a remark that totally got me into a spin, she said that I might be decent on cooking pasta and stuff but how come I havent done any deserts ! I tried defending myself, claiming that I was trying so hard to watch my weight, of cause she scoff off my attempts with a leering smile haha ! Next thing you know I made this sexy beast of a cake and stuff it in her mouth !

500g Ricotta Cheese
200g Cream Cheese
1/2 cup of butter
2 table spoon of Lemon Zest
1 1/2 table spoon of Pure Vanilla extract
3 cups of sugar
4 cups of Fruit yogurt
5 egg whites
1 whole egg

First you let the cheese warm up to room temperature. Use a deep mixing bowl and put both of them into it and start whipping them together. Take care not to whip too fast. Now after the cheese are well into a milky and creamy texture, slowly add in 1 whole egg and then followed by the rest of the egg whites. Add them in 1 egg at a time too. the sugar to taste 1 cup of sugar at a time. The reason is you have to taste the mixture to make sure you like how sweet the end cheesecake would taste like. I myself stoppped at 1 1/2 cups only. Next pour in 1/2 cup of yogurt into the mixture, plus the 2 table spoon of Lemon Zest and 1 1/2 table spoon of Pure Vanilla Extracts.

Now it all depends if you like to have some kind of biscotti at the bottom layer of the cheesecake, I personally dont really like the change in texture, but if you like to make it rich then do it like me, I use Oreo Cookies minus the cream in the middle for any cheese cake biscotti. Just buy a packet of Oreo Cookies, divide them up and scrap off the cream and just crush em up in your hands to the bottom of the spring form pan. Of cos before you do that always prepare the spring form pan with a good brushing of butter.

After the spring form pan is ready, empty the cheese mixture into the spring form pan and bake it for 45 mins in an oven pre heated to 350 degrees F or about 175 degrees C. After that lower the temperature to 300 degrees F or about 150 degrees C and bake further for 15 mins or untill the center is set. I usually keep baking it till I can see the top part of the cake turns a little light brown.

Next prepare a mixture of the rest of the fruit yogurt in a bowl. Add sugar to it till taste of your choice. Next add in 1/2 cup of roasted almonds and mix it in well. After which pour the mixture on top of the cheese cake. Next we put the cake back into oven and bake it for 20 mins with the oven set by at 200 degrees F or 110 degrees C. After that let the cake cool to room temperature and put into a fridge over night.

Serve with a sharp knife dipped in hot water. Enjoy !!!

Tuesday, August 14, 2007

Gnocchi


I was going through some really old cook books and that's why i found this baby ! its an Old Australia recipe and its called Gnocchi, the unique thing about this pasta dish is that you get to make your own pasta ! And that my friend is where the real fun is !

500g of Minced meat ( for this time I picked chicken breast )
300g of potato
4 whole tomatoes
3 table spoon of Tomato paste
1 whole large yellow onion
2 cloves of finely chopped garlic
2 cups of self rising flour
1 egg
2 cubes of chicken stock
2 cups of white wine
1/2 tablespoon of dill
1/2 tablespoon of basil
2 teaspoon of pepper
2 teaspoon of red chili flakes
1 teaspoon of salt
1 cup of warm water
3 table spoon of unsalted butter
3 table spoon of powder Parmesan cheese

First melt the butter in a deep saucepan, once the butter is brought to a simmer, add in the garlic and finely diced onions. Stir fry the onions and garlic till you see some juices. Now add in the minced meat with with the minced tomatoes , tomato paste, the salt , chopped chicken cube stock , basil and dill. Next add in the White wine and bring all that to a nice steady boil. Boil it for about 20 mins on low medium heat and add in the pepper and red chili flakes to taste. Boil until its a nice thick sauce, you may add warm water if you like your sauce a bit more fluid.

Now peel all the potatoes and cut them up into cubes, boil them in salted water until well done. Now take note to leave them to cool down to room temperature before you mash them up. Best way is to do them a day ahead and put them in the fridge and thaw it while you were cooking the sauce. Now put all the mashed potato into a large mixing bowl and add in the flour and a lightly beaten egg. Mixed it all together and add a little bit of salt to taste. Now knit the mixture into a dough and leave it there for 15 mins to 20 mins

Now take a table spoon and start plucking 1 tablespoon of the dough and press it into a oval shaped mini pan cake shaped pasta. Repeat for the whole dough. Now boil some water in a deep pot with salt and a little bit of oil if you like. The uncooked Pasta would sink first to the bottom of the pot and the cooked once would float to the surface. Rinse the cooked ones and put them aside on a large plate to let them dry and cool off.

Now before serving, bring the sauce to a simmer again and add in the pasta and stir lightly. Make sure the sauce coat most of the pastas surfaces. Now before serving, sprinkle some of the cheese on top. There you have it , good old fashion Australian Gnocchi !!

Enjoy !! :D

Friday, August 10, 2007

Baked Salmon in Grape Fruit butter sauce


One night I came home feeling rather hungry :P didn't know what to eat outside so I thought to myself, whats fast and nice :) so I decided to cook off the other half of the Salmon I bought from my last cook out :)

The recipe is really very simple,

200g of Fresh Salmon with skin
5 table spoon of butter
3 table spoon of fine flour
1 cup of full cream milk
3 table spoon of grated Parmesan Cheese
1/4 cup of Extra Virgin olive oil
1/4 cup of Table white wine
1/2 table spoon of sea salt
1/2 table spoon of black pepper
1 teaspoon of Dill
1 teaspoon of Basil
1 whole Grape Fruit
Aluminum foil

Preheat the Oven to 200 degrees Celsius or 400 Faher

Place the aluminum foil over a baking pan, next sprinkle some olive oil over the foil, next sprinkle sea salt and pepper over it, not too much cos you don't want the Salmon to become to salty.

Next slice the whole piece of Salmon into 2 equal piece. Now place the 1st half on the foil with the skin facing down. Now season with Grape Fruit Zest ( the grated skin of the Grape Fruit ) then add seasoning of Dill & Basil. Now place the 2nd half over the side of the 1st half and start to do the same to that slice.

Now cut 2 slices of the Grape Fruit and place it over the top of the Salmon.

Once the Oven has been preheated, lower the temperature to 150 degrees Celsius or about 300 Faher. Put the baking pan with the foil and Salmon in it and bake it for about 30 mins.

Once the Salmon is done leave it a side to cool.

Now the Grape Fruit sauce is really simple, heat up a deep sauce pan and drop in the butter.
Use low medium heat to slowly melt the butter and once its all done just slowly add in the flour and stir it all together with a wooden ladle.

Once the flour is all in and well mixed with the butter, add in the warm milk ( you can microwave the milk first or boil it first ) all at once. Slowly continue stirring the now sauce. Once its well thicken add in Parmesan cheese, and season with salt and pepper to taste.

Once all that is done, juice that Grape Fruit for its juices into a cup and slowly pour the Grape Fruit juices into the sauce. You will be delightfully surprise as you slowly add in the juice from that Grape Fruit, the sauce turns from white to Pink !!!

Now continue stirring for about 2 mins and then leave the sauce to cool.

Now you may either serve the Salmon and the Sauce together on a large serving plate or separately with the Grape Fruit Pink Sauce in a serving bowl :D

Enjoy !!

Wednesday, August 8, 2007

Pasta Squared in Olive oil, herbs and Chili Flakes Dressing & Zucchini


This is my favourite pasta, I did some modifications to it and added some spicy red Chili Flakes to it :P, that way some of my friends would feel more at home with this dish as its has a unique flavour that is very fresh and clean tastes.


Ingredients :


200 grams of Fresh Zucchinis

400 grams of any type of Pasta

1 table spoon of Red Chili Flakes

2 table spoon of finely chopped garlic

2 table spoon of coarsely chopped Fresh Basil Leaves

1 tea spoon of table salt

1/2 cup of Extra Virgin Olive Oil

1 table spoon of black pepper

1 teaspoon of Dill finely chopped

1 teaspoon of thymes finely chopped

1 teaspoon of parsley finely chopped


If anyone is asking where I got my fresh herbs and spices, you can find all of them at COLD STORAGE supermarket at IKANO the CURVE.


First clean the Zucchinis with running water. I bought the combo set which has both the Yellow and the Green Zucchinis. Next chop off both ends. Next slice along the whole Zucchini so that the thickness of each strips of skin is deep enough to have some of the crunchy parts with as much skin as possible. Try to cut as long as fine strips as you can manage but not cutting too deep till you see the seeds. This is to ensure that some times the seeds makes a bitter after taste to the strips. If you done it right, you should be left with just the body of the Zucchini with almost all the seed packed center parts to dispose off.


Now season the strips of Zucchini with salt and pepper and steam all the strips for 2 mins or so. This is just to make them crunchy.


Bring a deep bowl of water to a boil with a bit of table salt and olive oil. Once the water is boiling just add all the pasta in. Cook for 10 mins and rinse in cold water and drain. Next store it aside.


Now pour all the olive oil into a deep sauce pan, next bring it to a simmer and add in the garlics. Turn down the heat to medium low and bring the garlics to a golden brown. Once that is done, add in the chili flakes and the finely chopped herbs first. Immediately turn off the heat and add in the Basil Leaves and all the Zucchinis and the Pastas.


Toss the whole mixture of Zucchinis , Pastas , herbs and spices nicely, while the sauce pan and the oil is still warm. Then add salt , pepper and more Chili Flakes to taste of your choice.


Serve them up warm ! Enjoy it hehehe its lovely and easy to cook !


Monday, August 6, 2007

Oven Baked Lemon Zest Salmon with herbs & Spices


Hi ya guys and gurls, hoped you had a wonderful weekend :), before last weekend, a friend of mine made a request to me. She had been dying for some salmon :) and some Pasta in French dressing. Therefore I set out to cook for them :) after they heard that I was cooking, they recommended to come to my place to swim first then eat hearty hehe..

Ingredients :

400 grams of fresh Salmon with skin,
1/2 Table Spoon of Sea Salt
1/2 Cup of Extra Virgin Olive Oil
1 Table spoon of grated Black Pepper
3/4 pounds of Coarsely Chopped Basil Leaves.
1/2 Table spoon of Lemon Zest
1 teaspoon of Dill
1 teaspoon of Sage
1 teaspoon of Parsley
2 large 5 mm thick slices of lemon
Aluminum foils for baking.

First you need to spread out the Aluminum foil over a flat wide surface. Make sure you got lots of room to work with. Then sprinkle the surface of the foil sparingly with Olive oil , pepper and sea salt shaken on top. Dont need to coat it all inch by inch, just a 2 to 3 good shakes of pepper and salt will do just fine.

Next cut the Salmon in to 4 thick long slices of 5 cm to 6 cm thickness. Make sure its across the grin with one end is thicker then the other. Now lay piece by piece on 1 side first.

Next again 2 t 3 shakes of Sea salt again with pepper over the pieces, next take a few pinches of all the spices like the parsley, dill , sage and thyme leaves and sprinkle over them. Now take a Lemon Zest and also sprinkle over that side of the salmon. Repeat for all the other 2 slices.
Note not to over sprinkle the Sea Salt, else the meat becomes a little bit too salty hehe.

Now make sure you place the salmon with the skin under them touching the aluminum foil, the skin is better as it will not burn and stick to the foil while baking. Finally sprinkle a little of olive oil again over their tops.

Now place the 2 large slices of Lemon over the meat top, and fold the aluminum foil over them .

Preheat the oven to 150 degree celcius or about 300 degree Fahrenheit. Next place the whole aluminum package into the oven and bake for 20 mins.

Remove and serve on a warm plate.

Salmon has the highest level of sources for Omega oil which is great for health :) Bon Appetit !

Tuesday, July 31, 2007

Creamy Portobello Mushrooms Lasagna

This weekend I decided to bake something really sinful to reward myself for the hours at the gym, of course my gym friend Jenna would beg to defer as she is testifying I have been lazy really lazy lately ( dear Jenna, I will try to go to gym more religiously from now on haha !)


The ingredients for this dish is fairly simple.

6 pieces of Lasagna Noodles

5 cups of Full Cream Dairy milk

1 cup of normal white flour

900 grams of Portobello mushrooms ( of course some would like a heavier flavour could double the qty)

4 table spoons of lightly salted butter

1/2 table spoons of grounded black better

1 cup of Mozzarella Cheese grated ( again you prefer heavier flavors increase at your own desire :P)

1/2 cup of Parmesan Cheese powder ( same thing here if you are a cheese freak :P)

1/4 cup of Almond nuts grounded ( you can get these easily from bakery section )

some normal table salt.


First you put 1 table spoon of butter into a large sauce pan and melt the butter over low medium flame. Try not to boil the butter just let it melt slowly. Next add half of the Mushrooms ( of cos you have already remove the stem and slice up each mushrooms, thickness per slice is up to your desire ) Now stir fry the half the mushrooms for about 2 mins in that melted butter and next add in the rest. Add black pepper and salt to taste ( that means to your liking )

Once the mushrooms have been light brown in color and started to give you juices, remove them into a bowl and set it aside.

Next use the same saucepan, ( don’t wash off what ever is inside ) and pour all the milk into it and bring the milk to a simmer and pour it into a large bowl and set it aside.

Next melt 4 table spoons of lightly salted butter in low medium flame slowly. Try not to boil the butter too. After the butter are almost all melt, again use the wooden ladle you been using for the mushrooms to stir it lightly, at the same time sleeve the f lour slowly into the melted butter mixture slowl, while keep stirring the mixture.

After all the flour has been add into the mixture, pour in the hot milk in all at once. Now slowly stir the whole mixture now with the wooden ladle. Keep stirring untill the whole mixtures starts to thicken up. It will soon thicken in 3 minutes. Once that it has thicken into a sauce add the almonds. Keep stirring in low medium flame and add black pepper and table salt to taste. Finally add in half of your Parmesan Cheese powder into the sauce. Pour the whole sauce now into a large bowl, set it aside.

Next, boil a big pot of water. Add 2 teaspoon of table salt and 2 teaspoon of olive oil. Once the water has come to a steady boil at in 2 pieces of the Lasagna noodles. You can try and add more but usually i like to go slow as the noodles tend to stick together when it gets too crowded in there hehe. Boil the noodles for about 10 to 12 minutes max and move them into large bowl of normal room temperature water. Once they are cooled in the water removed them onto a large flat plate and set them aside.

Now, use a 2 inch deep baking square pan, preheat it in an oven of 175 degrees celcius or about 200 Fahrenheits for 10minutes. Next remove the pan and start by coating it lightly with the white milk sauce we cooked earlier.

Now set 1 layer of 2 pieces of Lasagna noodles. Next a nice 1/2 inch layer of white sauce, then the mushrooms , followed by a generous sprinkle of Mozzarella cheese. Continue with the layers until the last layer is used to covered the top. Now use the reminding white sauce on top of that last layer, you should have none of the mushrooms left by now. Just finish the last layer on top with more Mozzarella Cheese and the rest of the Parmesan Cheese powder.


Lastly preheat the oven to 175 degree celcius or 200 Fahrenheits. Next place the pan of Lasagna into it to bake for 45 minutes. Then once it has been baked, place on the table to cool for 15 minutes and serve hot.


I hope you guys would enjoy cooking this as much as I did for those of you who had the pleasure the have some ( you know who you are hehe ) please leave some comments.

Take care and good cooking !


Dont Play Play leh.... this is serious 2nd Skin :P .... saved my ass from a lotta pain more then once...

Now I noticed most divers in Malaysia dont use wet suits.. main reason is its such a hassle to get in and out of one during a diving trip. If you are content to just hover and glide 5 feet above the corals and stay clear of wrecks plus caves then its okie.
But me? i am nutz. I see a wreck ? i will sure ask for permission from the dive master to penetrate for sure. I see a cave or a good swim through, for sure be the 1st diver to signal my buddy if he or she wants to tackle it. Call me nutz but you are missing alot of stuff if you stay clear of these extras while diving.
Some of my best experiences comes from going into the rusty hulks of some Malaysian shallower wrecks. But boy there is so much life on these and inside these wrecks. For 1 there is the huge fishes that tends to hide within these sunken vessels.

This picture above is my Wet Suit. Its standard 3 mm thick. Its made of some high tech material which i don’t care to know but what i know is its been good to me and my body. See that mark on my right thigh? if it wasn’t for my suit I had a gapping hole there now hehehe.
Besides the fact its offers pretty good protections from sharp surfaces of the hard corals or rusty wrecks, its also helps a lot when you are diving below 25 meters of water. The thing is the water tend to get cooler as you get deeper. My dives has never been uncomfortable and I tend to amid I get pretty reckless thinking this suit can handle most brushes with sharp or rough surfaces under the sea
But the rule of thumb is don’t under estimate your risks while down there. Having a suit is like an insurance… but does not mean you can taunt danger and dive against on coming traffic


Thats how you get in from the back hehe , yes yes you will feel like some super hero in his or her superhero costumes hehhe . Now standard recommended diving for Tropical waters is 3mm, I have friends who said 1 mm is good enough.. But i have come across nasty thermo climes that could have fresh off my ballz if it wasn’t for this suit.
Also when you are planning to buy your own please always consult your dive master or a qualified store assistance. You see now all cutting and sizes fits all. After you have bought it, please do test it out with all your equipment to find your buoyancy again. The minute bubbles within these suits are what keeps us warm underwater but it also makes us naturally more positive buoyant. That means you float more easily with these.
You are advise to seek out your buoyancy level again and note that the amount of weights you will need to adjust to to dive during a real dive in the sea.
Beware that new suits tend to be more positively buoyant, mine got more manageable after like 40 dives or so.
Well thats about it for dive suits , its a personal choice really. But its never too careful to be careful right?

Euro Dinner Set..... Oven Baked Baby Potatos with herbs and olive oil...


This section of the blog would introduce the Oven Baked baby potatos in herbs and olive oil.
Wash and cute up about 10 baby potatos. Then proceed to cut them up into 8 equal pieces by cross section.
Next put all the potatos into a large mixing bowl. Next pour in 1 cup of olive extra virgin oil. Add a little teaspoon of salt and pepper for seasoning.
Next chop up some thymes . sage. rosemary and parsley. Add them into the oil mixture of the potatos and olive oil.
Preheat the oven to 190 degrees cel. After 10 ,om upon reaching the right tempreture, please put the tray of the potatos into the oven to back. First 15 mins please use 200 degrees C, next add in the potatos into the oven and cook for 30mins straight.
Once the potatos are easy to be handled by a normal dinner fork. It is ready to to be serve


Euro Dinner Set ..... Chinken Stew in Grape Fruit sauce herbs and sausages..


As promised, this is 1st part of 3 on how I prepared a full course EURO dinner for 8 peeps.

I first want to introduce the Chicken stew in herbs with sausages and carrots.

This actually not a difficult dish to prepare as its rather straight forward.

First prepare 1 quarter of full cream butter of a normal bar. Cut that bar of butter into a 7 inch deep saucepan.

Bring it to a simmer and add in your chicken. The amount of chicken for 8 servings would be about 1KG of chicken breastmeat. The breastmeat need not be marinated at all. Just add and let it cook for 8 mins to 10mins.

next once it has turned slight brown we can add in about 500 grams of sauages. Note its better to buy the sauages that has some pepper in it and not to use the normal ones from the canned variety. The ones you buy from the Gourmet corner tend to have more flavour and adds to the stew richness in taste.

Now once the meats are cook for about 15mins, remove all the sauces and the meats into a bowl.

Next add about 1 table spoon of butter and let it simmer. Then add in 1 Yellow Onion fully diced to small chunky bits. Next add in about 2 full sticks of carrots. Be mindful to cut up the carrots into nice 20 cent size chunks too.

Add in the spices , 1 stick of Thymes , 1 stick of parsley, 1 stick of sage 1 stick of chives and 1 stick of rosemary. 2 sticks of cinnamon sticks.

All the above herbs could be purchased from ColdStorage outlets. Next bring all of that to a simmer with 2 cloves of diced Garlic. Once the vegetables are cooking, bring to boil about 5 measuring cups of water and add in 2 cubes of chicken stock cubes. Bring to a slow boil.

Once the chicken stock is ready.. mix the vegetables with the meats and slowly stir. Add in the hot chicken stock 1 cup at a time, 1 cup is like a cup of tea , slowly simmer and add some flour to it to thicken the stew. As you finished the chicken stock, grate 1 Grape Fruits skin, take care not to grate too much into the white part of the GrapeFruits skin, as its bitter taste would not help with the flavour. Once you add in the grated GrapeFruit skin, you may add in 1 qaurter cup of White Wine. As the mixture is brought to a slow blow, you may add the glass of GrapeFruit juices from the original grated GrapeFruit.

Next add 1 teaspoon of salt and 1 teaspoon of grinded black pepper. Bring the whole saucepan into a slow boil for about 20 mins. After that you will server the Stew within a large bowl.


Once you have cooked the mixture for 20 mins you may serve the Stew in a large bowl

Darth Vader used to say... The Force is strong with this wan..... then heavy breathing follows ....

This is has to be the only think you cannot go diving without… seriously and of cause the most complex equipment yet
Yes we are talking about the regulator set.. The Regulator set is infact a combination of a number of different components
Each components can be swap out and change about with different brands too…

From the picture you can see my selection. The Primary Stage or 1st Stage is the top most metal component..That is by Apollo Japan. They make pretty decent recreational equipment.. and its balanced. Meaning it would give me the same demand and delivery of Air Supply at Any recreational diving dept up to 45 or 60 meters.


My regulator or 2nd stage is the Black piece with the silver trimmings. Its so far had been performing well for me but can be a little bit noisy Lol , hence the Darth Vader Joke … Its the same make as the 1st or Primary stage. The SPG or Air Guage is from Cressi, its the cheapest in the market and comes with a dept meter too in meters.


My Aux or Octos is the bright yellow Oceanic. I choose that model because of its low profile see the picture below.


The main reason why we divers have 1 breathing components is because the yellow colored ones are for emergency air supply support to your dive buddy. A dive buddy is who you have been paired off which every single dive. It could be someone you know or not.. the system works in a way PADI diving schools encourages recreational divers to always dive in pairs.. that way it dramatically reduces the chances for underwater accidents.
Now you would ask? what if theres not enough air to go around?? usually when the Dive leaders try to assign dive buddies they would pair the stronger diver with the not so strong diver… meaning if you havent had a constant dive buddy travelling with you , if you have good air consumption ratio , you usually get paired with someone who consumes air pretty much faster then you do. How we measure that is by the below device at the end of every dive.


The first dial displays the dept you are at and at the surface the red marker shows how deep you went. It is reading that my last dive was over 20meters. And when we climb onboard the boat , the dive masters would record how much air we have left on the bottom dial. Usually the red areas 50 bar and below are considered dangerous to continue diving… its best practice to be already ending a dive when you have touched 50 bar…
On average, a normal Guy can finish a deep dive profile of 10 mins below 25 meters , 15 to 20 mins above 20 meters and finally 20 mins above 15 meters. The reason we have different time limits for different depths is because compress air behaves very differently at every 10 meters.
At every 10 meters , the air and your body is taking on another level of pressure. The air we breath is compressed further so , technically you are breathing more of the air thats been compress to a lesser volume hehe… not very encouraging I know.. wish we all could grow gills then eh??? me too.
Still even we carry a significant low supply of AIR, there are strict rules to follow that makes us very safe too.
Number 1 rule of diving is actually rather ironic too… Never ever hold your breathe. Even when the regulator is knocked out of your mouth by accident , you are not suppose to ever hold your breathe… you must immediately allow small bubbles of air leak out through your lips. The reason is when air is in your lung and you are going up , the air you had taken in at higher water pressure at deeper levels slowly expands outwards. Therefore filling your lungs up more. So imagine you hold your breathe and it expands further? yes you will burst like a balloon for your lungs. Thats the most common type of fatal accident that can happen. Its very rare , so rare its safer to dive then to drive hahaha.
Ok thats all for now.. Take care and happy diving !!!

FINS ....... DO WE REALLY NEED THEM ..

The thing is if you want to dive without FINS , then you need a size 30 feet with webbings like a duck feet between your toes to function as a FIN.
There are 3 types of fins in my point of view. POWER FINS , JET FINS and BIO FINS.

well dunno why but in the diving community they love to flam peeps who support alternate types of FINS but their own….

And there are the ever stylish freakishly high-tech FORCE FINS. I will be talking bout my FINS , the POWER FINS. Picture below


Yes they are the same ones used by US Naval Seals 20 years ago. Why change something thats not broken right? its very simple and easy to use. Plus its shorter in length infront so walking around with it is not as hard as try to walk with the normal 1 meter length ones.

From the next picture you noticed that its 1 single piece constructions. No high tech manufacturing techniques at all. Thats why its been said to last you a lifetime.

Now you will need one of these below to use my type of fins. Its called a dive boot.


This is because my Fins design is called open Sole type. There are full Sole fins out there that is like a huge slipper with fins

That type of FINS you dont need to have to wear dive boots. The reason i found having Dive boots really is sometimes the dive boats are a couple of 100 meters away so you need to walk there on foot , just imagine the hot sand or the odd rocks or sharp corals along the way??? hehe get the idea right.

Now for the other fins you can go google it with the names I supplied earlier on. Make sure to try on the FINS with the BOOTS as there are different cuttings to a boot and materials like normal shoes. It has to be compatible to your FINS. Its must be a comfortable fit with both on and the end of the fins should be touching your ankles. Thats very important as if you are too far behind your ankles , that means the fins are too big for you and you cant power it under water. If its too short infront of your ankles , that means its too small and you will be wasting alot of your strength using it underwater.

Finally just a note on how to use fins in the water. When you swimming normally on the surface of the water, try to put as much of the fins into the water and not lift it out of the water as it will be wasting alot of time and energy to push it back into the water again each time you kick. I usually just lay on my back instead of my front to kick towards the pickup boat hehe …. Also when under water, bear in mind its not the upward stroke of the fins that gives you the force to push you forward. Its actually the downward stroke that does the pushing. So conserve energy while doing the upstroke and put more effort in for the down stroke or kick. Try not to use your knees only to kick , use the largest muscle to do most of the work hehe and that would be your Thigh muscles and buttocks


0 Comments

IF ONLY I AM A FISH !.... THEN I DONT NEED THESE

Today I going to talk about MASK !
Its one of the major part of the scuba diving sports , but has been a favorite debate subjects…
some would even go to war ! defending what they feel is the best type of FINS … or MASK.
There are generally 3 Types of MASK in my point of view. Please dont flam me if you dont like my selections hehehe.
There are for MASK, FRAMED MASK, FRAME LESS MASK and PARA MASK.
FRAME LESS MASK.

The reason why its frame less is becos as you can see the plastic or rubber is moulded around the glass part of the mask. This in turn gives it a lower profile. The reason for my choice is the closer the glass is to the face of the user, generally you can get more viewable area hehe, think about tunnel vision.
Since if it was a framed mask, its plastic frame would be thicker, you will experience less field of vision. Also the lower the amount of air between your face and the mask, the less chances you can feel the suck out effect. This is due to the air been compressed by the water around you when you go deeper into the sea. That can be usually balanced out by blowing a little air out of your noses when you fee; the face squeeze hehe.
Now there are 2 points when you are buying and preparing a mask.


See the picture above. This is how you been testing a mask when you look right into it. Now without putting the rubber band around and over your head just lightly place the mask over your nose and eyes.
Next just inhale slightly through your nose and let go of the mask while your head is looking straight down. If the mask is a good fit on your face profile or type , it should be able to stay in place on your face and wont drop off by itself after 20 secs. If it has a bad fit around your face, the air around you will seep into the mask and cause it to slowly peel off. Thats the simplest rules to test the fitting of the mask on your face.
Now to prepare the new mask for use, its a bit more tricky, some might ask you to just put tooth paste on the inside of the mask glass parts and leave over night and wash it off with a tooth brush and running water.
The reason is all new mask comes with some kind of chemical coating on the inside of the glass part of a mask. Its a factory default. Therefore you need to peel or wash off that layer to prevent the mask from foggin easily while using it underwater.
What I learned is a bit more effective but needs a steady hand. I would prepare my mask by using a small lighter, the type you can buy off the tobacco or cigarette counters. Then slowly warm the inside of the glass part surface, as you do that you can clearly see the heat from the small flam slowly but surely burning off and evaporating off the chemical coatings with all new Mask. Once you got to heat off all the glass surface inside the mask, you maybe leave it to cool for 10 mins and then wash off the inside with tap water.
Now all you need to do is to spit saliva into it and wash it off with sea water and you are guaranteed clear vision through out a 1 hour dive hehehe . Of cos some more civilized divers unlike myself would still prefer to use commercial anti fog products on the inside of the treated mask glass part instead hahahaha.
Thanks for reading this blog and take care.